 The Patiala salwar pattern is developed from the plain salwar pattern. This is one of the most fashionable salwars. It is worn with a long blouse like garment known as Kameez. This type of patiala salwar used by all, irrespective of age and nationality. Cut and sewed with a number of variations to suit different occasions and personalities. Salwar is varied to suit the current trend in fashion.
Measurements:
Salwar Length : 41”
Hip : 38”
Waist to hip : 8”
Ankle Round : 12”
Material Suggested:
Cotton, grape.
Material Required:
3 ½ Mtrs
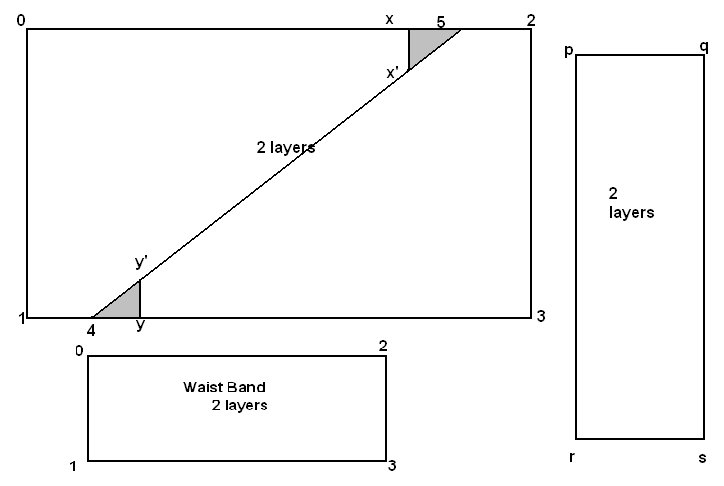 Waist Band Construction:
(0-1) & (2-3) = Waist to hip + 2” = 8”+1½” = 9½”
(0-2) & (1-3) = ½ hip + 2” = 19”+2” = 21”
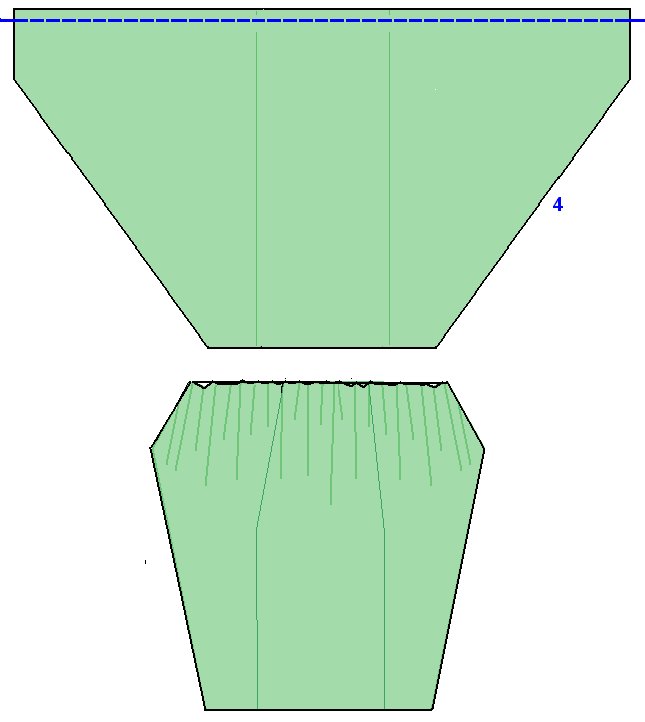
Construction:
(0-1)& (2-3) = (p-r) & (q-s) = (Salwar Length – Waist Band Length) + 1½“= (41”-8”) +2½” = 35½”
(p-q) & (r-s) = approximately 12"
(1-4) & (2-5) = 2”
Join (4-5)
(x-x’) & (y-y’) = crotchline= 6” [you have to find 6” straight line in between (0-5) to (4-5) & (4-3) to (4-5)]
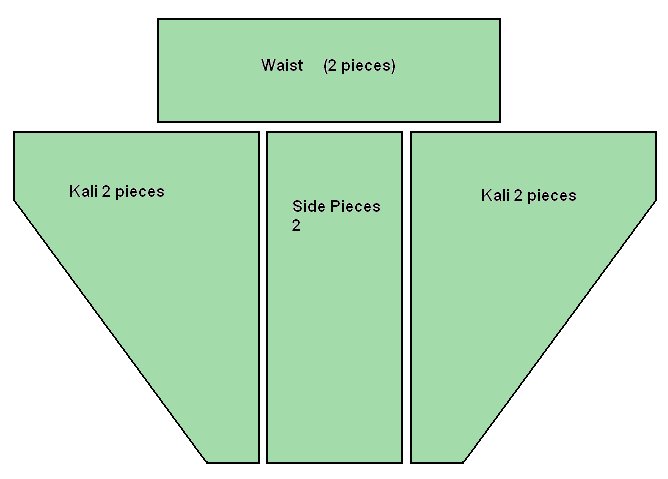
Cutting line:
Kali pieces: 0-x-x’-y’-4-1 & 2-5-x’-y’-y-4-3
Leg side pieces: p-q-r-s
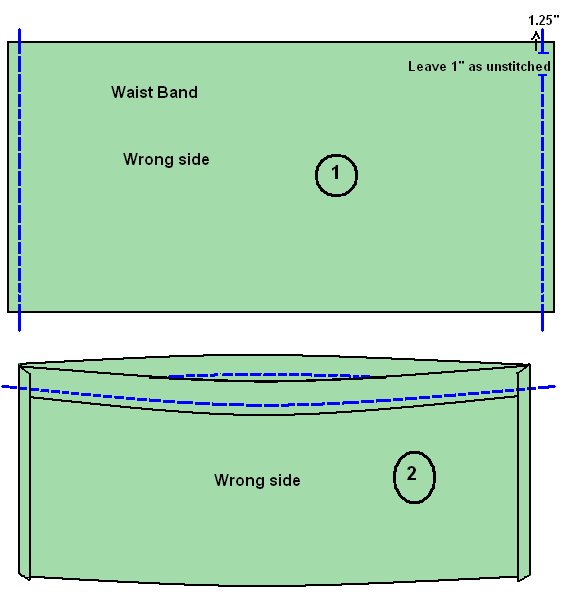
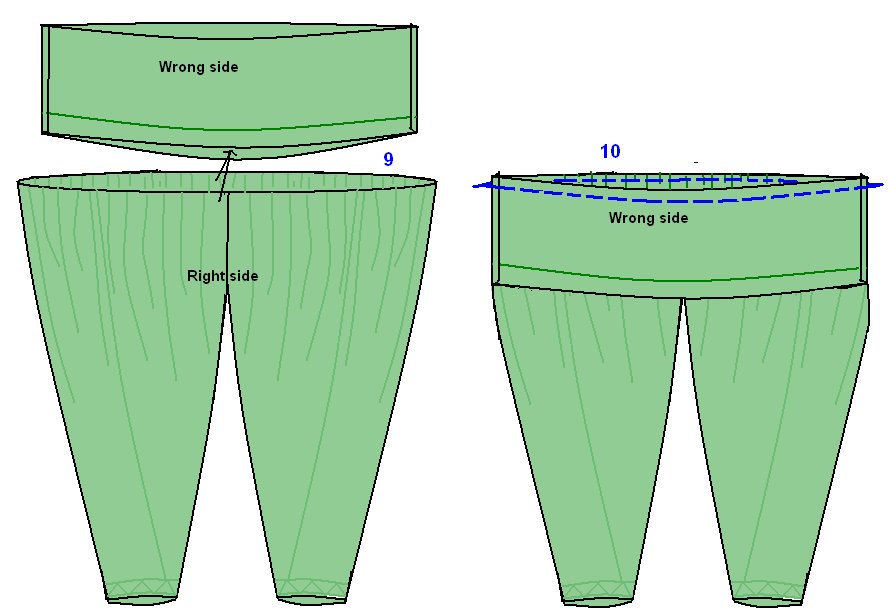
Waist Band Sewing Instructions:
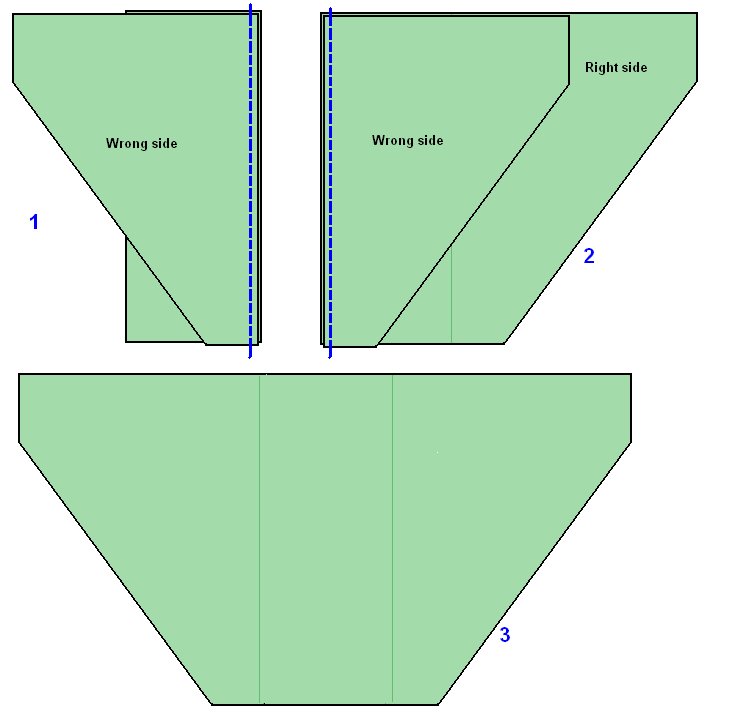
Sewing Instructions:
[caption id="attachment_5650" align="aligncenter" width="342"]
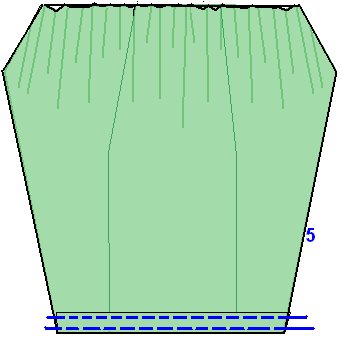 5. Fold ¼” inside the bottom of each leg parts and again double fold 1” inside and sew along the two sides of folded portion.[/caption]
[caption id="attachment_5654" align="aligncenter" width="429"]
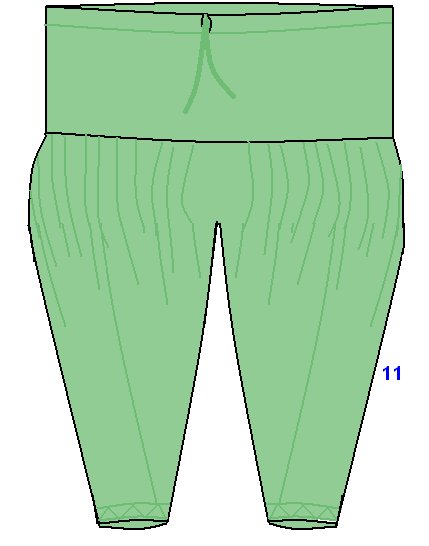 11. Insert Tie rope through the gape we provide at the top of waist band.[/caption]
Now the PATIALA SALWAR is ready to wear…
Thank you...your pattiala tute with measurements is very nice and detailed one...pls post kurthys..babyfrock..infantdress and different types of neck etc..once again ..thank u.
ReplyDeleteThanks...Sheela...reversible baby frock was already here..
ReplyDeleteI'll do tutorials asper your request... Keep in touch...
Dear selvan your patiala tutorials good but since am a beginner want to know how the cloth is to be folded in two or four layers
ReplyDeletedear selvan want to know how to old the cloth in two lyers or four i was taught in four layers am just beginner then joining leg kali pieces can you make it a bit clear anu videos of this? please suggest
ReplyDeleteSorry for the delay...Amritha prabhu.. U have to fold ur fabric once(now u have 2 layers) and cut the folded line, because this pattern don't need any folded area. Then mark waist band and leg side pieces at any one side and cut. The whole balance fabric is used for Kali pieces...if u want more details about this cutting instruction.. I'll prepare some detailed pictures for u..
ReplyDeletePlz tell me how i stitch a prience line cut sari blouse
ReplyDeleteHi.. Manisha purohit..are u asking sewing methods of princess cut saree blouse...? If I'm right... Plz..wait for few days.I have a plan for princess cut blouse tutorial. Keep in touch.. bye..
ReplyDeletePls share normal blouse full details tutorial MAM...
ReplyDeleteThanks for the visit... Srividya Suresh...I'm so happy to do the tutorial that u ask... Plz wait for some days.. I'll do it as soon as possible... Keep following..
ReplyDeleteThis website is very helpful for us. Thanks for sharing step by step tutorials. Pls share princess cut saree blouse drawing method tutorial.
ReplyDeleteThnks,
Harini
Thank u very much MAM...
ReplyDeleteI'm waiting...
Thanks for giving pattiala cutting.pls share normal blouse cutting (cross piece). Thank you.
ReplyDeleteHi..Harini.. Thanks..l'm very happy to here this tutorial helpful for you. Now I'm preparing some tutorials.. definitely I'll do that tutorials (that u ask) as soon as possible.
ReplyDeleteWelcome...
ReplyDeleteYea..sure.. Vanuthavani...thanks for the comment...
ReplyDeletesure please can u give me more details as to how to cut waist band and leg side pieces and from which part of the cloth will the cloth be sufficient then how will kali pieces be cut with balance cloth we need 2 leg pieces waist band single poece or join? cn you make these clear
ReplyDeletecan you please make clear how to cut waist band and legside pieces single piece or join you need 2 pieces for both right it can be cut from any piece of cloth cut from joint will the material be sufficient how much cloth for average hieght can you please give detailed pictures please
ReplyDeleteAmritha prabhu... U have to cut 2 separate leg side pieces and 4 separate kali pieces. First fold the cloth as lengthwise, now u have 2 layers(cut the folded line)... Then mark leg side pieces and waistband at the raw edge side. Then use the whole remaining materials for Kali pieces... If u cut Kali pieces with 4 layers, that increase waste of materials.. Patiala should have more pleats, that's why.. I suggest 3.5mtrs... U can do it with less pleats asper your convenient.. U can do it with 2.5 mtrs also..
ReplyDeleteHi Keerthi, Thx for such a elaborate tutorial of patiala slawar, Can u pls share draffting & cutting of palazzo pants. Thx in advance . Hav a gud day >
ReplyDeleteHi...roney12.. Thanks for the comment... Palazzo is in my future tutorial list..coming soon...keep in touch... :-)
ReplyDeleteThanks for the tutorial of patiala salwar.Is there any way to get your tutorial in my e-mail address......If poossible...........it will be helpfull for me.....................thanks
ReplyDeleteGood post mam...i want to know about the designer blouse mam..post the cutting method as soon as possible..
ReplyDeleteGood
ReplyDeletehow much length are using for patiala salwar
ReplyDeleteThank u so much for taking much pains for beginners like me
ReplyDeleteWelcome... Happy sewing...
ReplyDeleteThanks for the given details .it is very useful for me, i always confused about the measurment but now i won't. Thanks again.
ReplyDeletePlease send me patiyala pant cutting images and how to stritching mam
ReplyDeleteNow im going to stritch first time
ReplyDeleteDear Madam,
ReplyDeleteThis is with reference to your draft of a patiala salwar.
My reference is to this step:
(0-1)& (2-3) = (p-r) & (q-s) = (Salwar Length – Waist Band Length) + 1½“= (41”-8”) +2½” = 35½”
I think this should read as (0-x) & (3 to y) because that will indicate the length of the patiala salwar - length of the waist band and not (0-1) & (2-3).
Please let me know if I am right.
Thank you,
Subhashree Srinivasan
Sorry, sorry. There is no error in your draft. Sorry again.
ReplyDeleteIts ok... i hope u understand it now.... Happy sewing
ReplyDeleteU r doing a great job
ReplyDeleteCan u send me a link to normal salwar stitching
Nice. Iam already in this field for past 13yrs.your notes regarding patiyala is good and easy to understand. Tq.
ReplyDeleteHello ma'm... happy to see comments from such an expert like u... thanks mam
ReplyDeleteI like the post very mush.
ReplyDeleteHi keerthi, I was looking for double katori blouse. Can you please share the drafting , stitching method of double katori blouse. Thanks in advance.
ReplyDeleteThank you Keerthi... This is the best tutorial for a beginner like me. The correctness of measures is the key part. You explained it in very nice and clear way. I loved your tutorial. Not only this ,every other posts are simple and clear. Thanks a lot Keerthi.
ReplyDeleteBlouse cutting hindi me batana didi
ReplyDelete