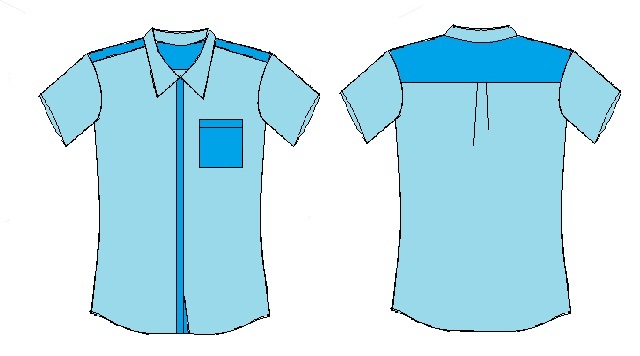
A shirt is a sort of top, a piece of clothing for the trunk of the body.
In the UK, it refers almost exclusively to what Americans call a dress shirt, a garment with a collar and a full vertical opening with buttons. In the US is tends to have a vaguer meaning, being applied to many types of (mainly men's) tops. leaving the word "top" generally for ladies wear. Click here to know more about men’s formal shirt.
You will need the Following Things Before we start:
- Basic sewing needs
- 1.5 to 2 meters of a suitable fabric
- Interfacing canvas fabric for collar
- Buttons
Next fabric selection... most of us choose Natural Fabrics like cotton, Corduroy, Denim, Flannel, Hemp, Leather, Linen, Seersucker, Silk, Terrycloth and Velvet. Some of us choose different types of Synthetic Fabrics like Acetate, Acrylic, Nylon, Polar Fleece, Polyester, Rayon and Spandex.
Required measurement for Men's shirt Drafting - bodice:
Back shirt length-
Chest-
Shoulder-
Neck to chest-
Shoulder to chest-
If you want to know the standard measurement details for men..Click here.
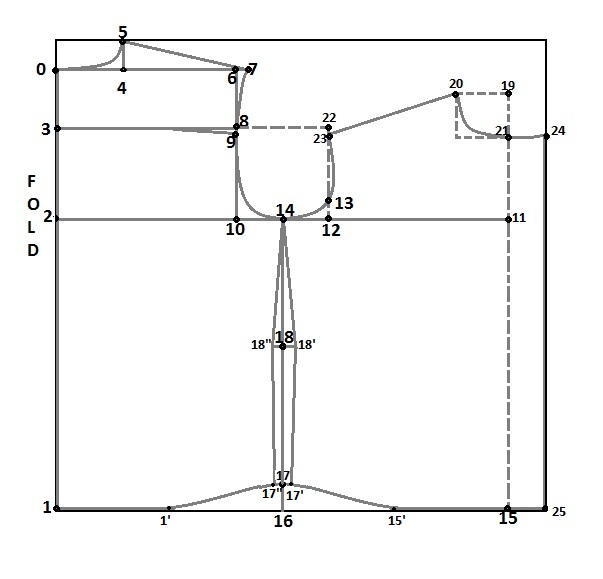
Men's Shirt bodice draft details:
0-1 = Back length
0-2 = Neck to chest
0-3 = Yoke height = 2 ½”
0-4 = 1/6th of Neck round + 5/8”
4-5 = 1/8th of Neck round
0-6 = ½ shoulder
6-7 = ¾” Connect 5-7
3-8 = 0-6 Shape 8-7
8-9 = ¼” down Shape 3-9
2-10 = 3-8
2-11 = ½” chest + 2¾”
11-12 = 2-10
12-13 = 15/8” above
14 is midpoint of 2-11
1-15 = 2-11
16 is midpoint of 1-15. Connect 14-16
Point 2” above from 16 as 17
18 is midpoint of 14-17
18’ & 18” is 1” away from 18
17’ & 17” is ¾” away from 17
Connect 17’-18’-14 and 17”-18”-14
1’ is midpoint of 1-16 and 15’ is midpoint of 15-16
Shape 1-1’-17” and 15-15’-17’ as shown in draft.
11-19 = Shoulder to Chest
19-20 = 1/6 Neck round - ¼”
19-21 = 1/6 Neck round
Draw horizontal reference line from 3-8 to the right about halfway to line 19-15
Draw vertical line from 12 (this should cross 13) to meet the above reference line and mark that meet point as 22.
Measure 5-7 then less 1/8” from that measurement. Pivot your ruler around on point 20 until it intersects with the vertical line 12-22 at the measurement you just found. Mark this meeting point as 23. Connect 20-23.
Shape armhole 9-14 and take extra inside ½” between (13-23) at front armhole.
(21-24) & (15-25) = 1¾” for button and buttonhole stand. Connect 15-25-24-21
Mark ¼” up from point 24 and shape as shown in draft.
Now the shirt bodice draft is ready…
Tracing Pattern From Draft:
Yoke Piece: 0-5-7-8-3
Shirt Back: 3-9-14-18”-17”-1’-1
Shirt Front: 25-24-21-20-23-13-14-18’-17’-15’-15-25
First cut the draft and mark this draft to the fabric with seam allowance of ¼” all around the cutting lines except hemlines. Give ¾” seam allowance for hem line. (Hem lines are 1-1’-17” & 25-15-15’-17’)
Now u have to cut 1 piece of Front right, front left, back and 2 pieces of Yoke.
Note: *Some people prefer to place fusible interfacing in the buttonhole placket too. If you like that, cut out a rectangular strip that is as wide and just as long as your buttonhole placket.
Collar, Sleeve, Cuff and Sewing Instructions are in our next Tutorials….
How can i get Collar, Sleeve, Cuff and Sewing Instructions for your next Tutorials….
ReplyDeleteThank you Keerthi. I will make shirts in Afrian material for my huband and son.
ReplyDeleteWhen I study this, I think that 2- 11 is wrong.Please reply me
ReplyDeleteReally superb and my hearty wishes for ur upcoming success
ReplyDeleteThis is a very simple and easy step in learning how to cut a custom shirt but I have a problem with 2-11 can you please explain the meaning of 1/2 chest + 2(3/4)
ReplyDeleteHi keerthi ...
ReplyDeleteI'm a fashion designer, and I love your teaching so much, it is very helpful.
Please I will need more of your teachings and videos please through my email.....
Hope to hear from you....
Thank you
hi I am M Anowar beginner in pattern making but i cannot understand soulder to chest and neck to chest measurements in mens shirt please explain
ReplyDeleteCould you kindly email me a pdf download instruction.
ReplyDelete2-11 is half of chest +2¾"
ReplyDelete2¾" means 2 inches + 75% of inch
I am just confiuse
ReplyDeletehi.. thank you so much for the pattern..its perfect. I made one for my husband,, but since he is a big sized man, I made it a bit different. well..once again..thank you..as mageshkumar said..I wish for your upcoming success
ReplyDeleteThank you keerthi,
ReplyDeleteIt is very useful.
Can you dedtail the changes for casual shirt.
What are the standard measurements for Neck to Chest and Shoulder to Chest? The rest of the drafting explained so well. Thanks.
ReplyDeleteHere shirt pattern to download:
ReplyDeleteHi Keerthi
ReplyDeleteCan you help on the difference between 0-2 in Back (Neck to Chest) and 11-19 in front (Shoulder to Chest)?
For eg: My chest is 38", Shoulder to Chest is 9.5", Neck round is 38cms. How do I calculate 0-2 and 11-19?
Thank u very much
hellloooo...am waiting for your reply to help me start the draft of the shirt. Also the back length of the shirt looks longer than the front? Why is this so please?
ReplyDeletePlease help me
ReplyDeleteHow to measure shoulder to chest???
How to measure and cut the armhole as well as the sleeves
ReplyDelete