Straight Kameez (Tops) Tutorial
Kameez is a traditional costume of Punjab. It is used along with Salwar, Churidar or denim pants. The neckline can be shaped according to fashion. This garment is basically cut into three pieces, the front, back and sleeve. Darts are used to give fit or shape to the garment.
The construction of this tutorial may look long but it is very easy, just follow the instructions and you will end up with your own Kameez top.
Measurement:
Length -
Chest -
Shoulder-
Waist length-
Hip length-
Waist –
Hip -
Armhole-
Sleeve length-
Round arm-
Neck width-
Front & Back Neck depth-
Material Required:
1¼ Mtrs
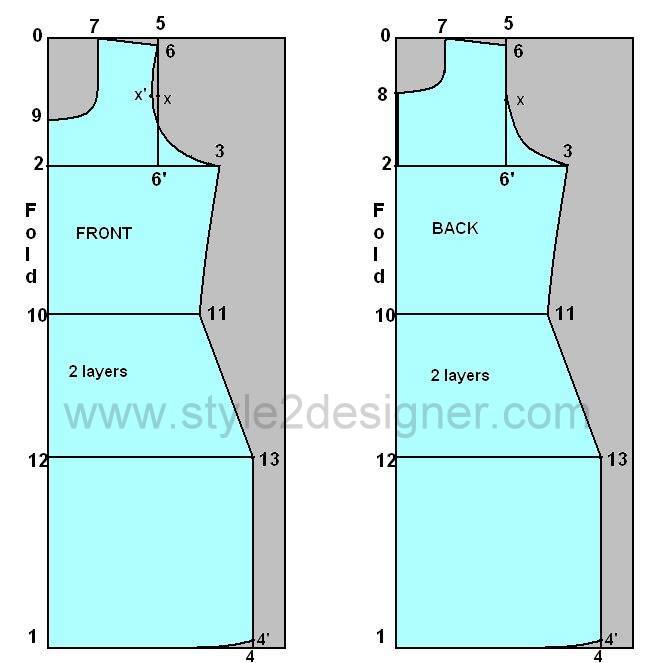 Construction: Front
(0-1) = Kameez length (desired length)
(0-2) = Armhole depth = ¼ chest – 1”(for Medium figure) or 2”(for heavier figure)
(2-3) = Chest line = ¼ chest + 1” (for Tight fit) or 2” (for loose fit)
(5-6) = Shoulder drop = 1cm
(0-5) & (2-6’) = ½ shoulder
(0-7) = Neck width
(0-9) = Front neck depth
X is mid point of 6-6’. (x-x’) = 1cm
Shape (6-x’-3) front armhole curve.
Measure 6-x’-3 it should be more than ½ armhole by 3 to 4cms.
(0-10) = waist length
(10-11)= ¼ waist + 1” or 2” (same as chest line)
(0-12) = Hip length
(12-13)= Hip line = ¼ hip+2”
(1-4) = same as hip line
(4-4’) = 1” up for shaping. Join (1-4’) hem line
(4’-13) = Slit opening (Slit should not cross the Hip line)
Cutting line:
9-7-6-x’-3-11-13-4’-1 (9-1) on fold
Construction: Back
(0-1) = Kameez length
(0-2) = Armhole depth = ¼ chest – 1”(for Medium figure) or 2”(for heavier figure)
(2-3) = Chest line = ¼ chest + 1” (for Tight fit) or 2” (for loose fit)
(5-6) = Shoulder drop = 1cm
(0-5) & (2-6’) = ½ shoulder
(0-7) = Neck width
(0-8) = Back neck depth
(8-8’) = Back slit opening = 1/6 chest + 1”
X is mid point of 6-6’.
Shape (6-x-3) front armhole curve.
Measure 6-x-3 it should be more than ½ armhole by 3 to 4cms.
(0-10) = waist length
(10-11)= ¼ waist + 1” or 2” (same as chest line)
(0-12) = Hip length
(12-13)= Hip line = ¼ hip+2”
(1-4) = same as hip line
(4-4’) = 1” up for shaping. Join (1-4’) hem line
(4’-13) = Slit opening (Slit should not cross the Hip line)
Cutting line:
8-7-6-x-3-11-13-4’-1 (8-1) on fold
Cut 8-8’ on fold for back neck slit opening (Neck slit opening need only at the circumference of head is lesser than neck circumference)
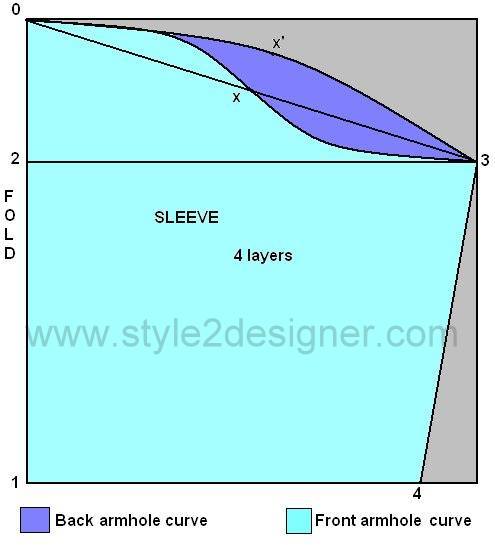 Construction: Sleeve
(0-1) = Sleeve length
(0-2) = 1/8 chest – 1½”
(2-3) = ¼ chest – ¾”
(1-4) = ½round arm
Join (3-4) under arm seam
Join (0-3)
X is the mid point of (0-3)
Take (x-x’) = 2 to 2.5cms up
Shape 0-x-3 front armhole curve
Shape 0-x’-3 front armhole curve
Cutting line:
1-4-3-x’-0 then cut through the first 2 layers 0-x-3
Seam Allowance:
¼” on neck line, armhole and back neck slit open
1” on side seams
1½” on hemlines
Sewing Instructions:
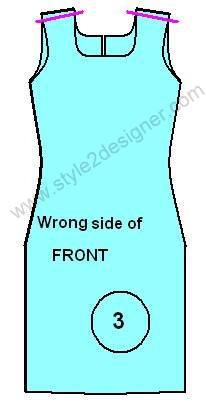
[caption id="attachment_5696" align="aligncenter" width="494"]
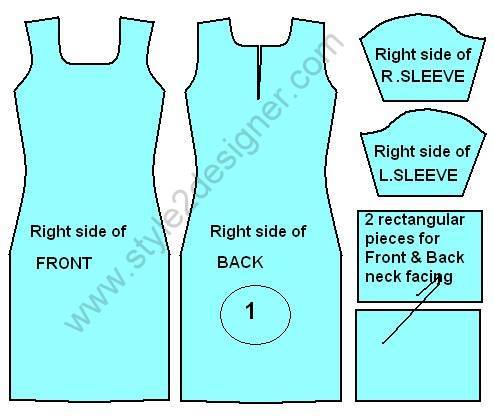 1. Take 2 Pieces of Kameez (Front and Back) 2 Pieces of Sleeve (Right and Left) and 2 rectangular pieces for Neck facing.[/caption]
Click HERE to know about the Folding instructions for Kameez and sleeves.
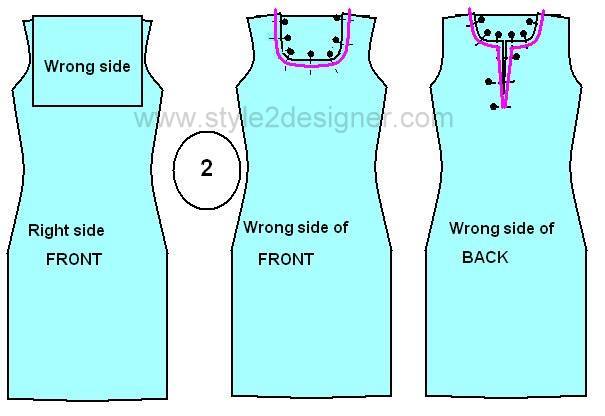
2. Place the neck facing rectangular pieces for the front and back Kameez pieces respectively. Make sure that the right sides are together. Pin and sew along the neck line with ¼” seam allowance. Cut the excess of facing pieces and make notches on seam. Then turn right sides out and press. Give topstitch at neckline.
[caption id="attachment_5698" align="aligncenter" width="206"]
 3. Place Kameez front and back pieces by facing right sides together and sew along the shoulder line to joint the two Kameez pieces together.[/caption]
[caption id="attachment_5699" align="aligncenter" width="379"]
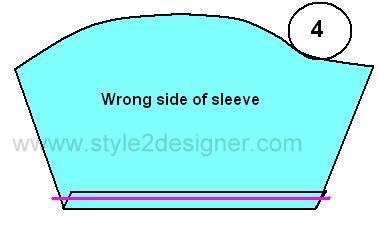 4. Fold the hemline of sleeve by ¼” inside and fold again ¾” inside and sew along the hemline at the edge of first folding.[/caption]
[caption id="attachment_5702" align="aligncenter" width="295"]
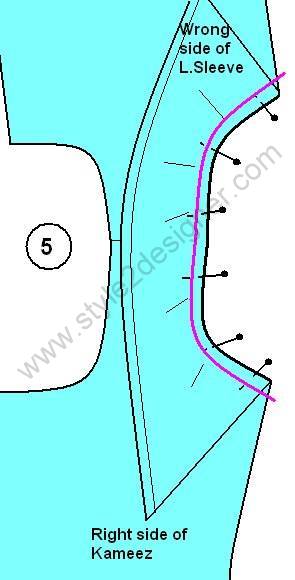 5. Place the Sleeves right side on the top of Kameez armhole area respectively. Pin it and sew along with ¼” armhole seam allowance.[/caption]
[caption id="attachment_5700" align="aligncenter" width="284"]
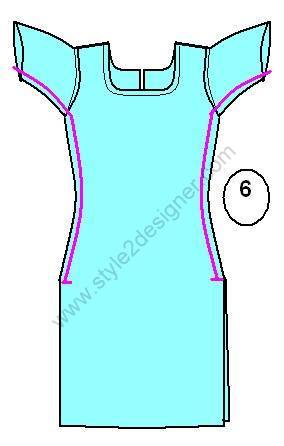 6. Turn Kameez wrong side out and sew along with 1” side seam allowance as right sides together (Start from Sleeve’s hemline and stop at the Hip line of Kameez).[/caption]
[caption id="attachment_5701" align="aligncenter" width="546"]
 7. Fold at the slit opening ¼” inside and fold ¼” again. Then sew along the slit opening of both sides. Press with iron.[/caption]
[caption id="attachment_5703" align="aligncenter" width="555"]
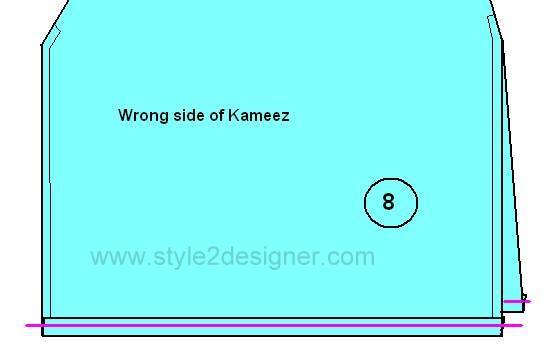 8. Fold the hemline ½” inside and fold 1” again. Then sew along the edge of first fold on hemline.[/caption]
Now the Kameez Top is ready…..
Thank you very much for salwar kameez cutting..
ReplyDeletePls teach us different types of neck pattern also.how to cut.and...stich.
Am slightly fatter on stomach not much how much loose to measure kameez length is 40 have to take correct measurement
ReplyDeleteIf cloth is folded in 4 layers then how to take measurements separately measures will be same right
ReplyDeleteHi.. Sheela.. Thanks for your comment..and sure I'll do tutorial of neck patterns....
ReplyDeleteAmritha prabhu u have to add 1/2" or 1"(up to your convenience) in (10-11), (12-13) & (1-4). It will help to increase the width of your kameez's waist part.
ReplyDeleteYou are right...Amritha prabhu... Measurements are same....
ReplyDeleteRealy it is easy for the beginners . Thanks for giving this. before that i dont know how to stich a kameez neck. i stiched it like a blouse neck . now i fell it as a simple one. Thank u mam.
ReplyDeleteU r welcome.. Vanithavani...
ReplyDeleteAm 90kg standing 5'4" tall aged 47yrs woman. My middle portion is very broad. So as u hav told, wearing a Patiala will make me look slimmer? How long the kameez should be
ReplyDeleteHi.. Beena.. Mam.. If u choose kameez...Plz remember the following points. It should be. *with vertical prints,stripes or lines
ReplyDelete*light shades
*with full sleeve(don't go with cap, 3/4th or sleeveless)
*choose with broad neckline borders
*slightly loose fit(not very loose)
Salwar should be *in dark shades
*narrow salwar or cigarette cut pant
*a light weight material
If u choose blouse use half sleeve or short sleeve
Keerti,let me thank u in the first place for ur reply. Shall I know what is narrow salwar or cigarette pants?
ReplyDelete
ReplyDeleteCigarette cut pant
narrow salwar
ReplyDeleteThank u very much keerti...
ReplyDeleteU r welcome...mam..
ReplyDeleteKeerti, one more doubt. What should I keep the length of the kameez.?
ReplyDeleteGood morning.. Beena Mam... Long kurtas suits well. But U can wear above knee length kameez with narrow salwar and knee length with cigarette cut pant.
ReplyDeleteThanks a lot keerti
ReplyDeletePleasure is mine...Been a mam.. Your questions may helpful for other readers...
ReplyDeletehi, keerthi mam i need to know anarkali cutting pattern can u teach me
ReplyDeleteHi..Karthika... Sure...Anarkali s our next tutorial...
ReplyDeleteHello,
ReplyDeletePls can u explain
Where did -x come from
And also the cutting line formula.
1-4-3-x-0 ??? I don't understand this
Thanks
Nadia
Hi... Nadia...
ReplyDeleteYou should mark x at the mid point of 6-6'.
Cutting line instruction shows where should we cut this pattern. If 1-3-4-x-6 means start from 1 continue with other mentioned point one by one & ends in 6.. I hope u can understand now... :-)
can you post a tutorial for cigarette pant please?
ReplyDeleteThank you so much Mam for umbrella dress. please teach cap sleeve cutting and stitching.
ReplyDeleteHi Keerti
ReplyDeletePls give me a solution for front neck moving upwards, tried many ways but it is not satisfying
yaa...sure...that should be in my future tutorial...:-)
ReplyDeletehappy to see ur comment... cap slleve added in request list..and that tutorial will be publish in future...
ReplyDeleteit helped me a lot please add different neck pattern tutorial you have created really beautiful website
ReplyDeleteThanks for ur valuable comment..
ReplyDeleteComment Text*Dear Keerti,
ReplyDeleteI don't know how much i have to thank you for such a useful blog. Its really appreciated, answers for my doubts. Another problem s why my front shoulder and neck are going backward when i wear kurta. Please suggest a solution.
I don’t know how much i have to thank you for such a useful blog. Its really appreciated, answers for my doubts. Another problem s why my front shoulder and neck are going backward when i wear kurta. Please suggest a solution.
ReplyDeleteHi! Just wanted to know, is the seam allowance included or does it have to be added ?
ReplyDeleteHi.. Amirah.. Seam allowances not included in draft details. There is detailed seam allowance seperately.
ReplyDeleteHi! Lovely tutorial. However I didnt understand if the HIP LENGTH is my hip circumference or the measurement from hip to bottom of kameez. Please help. Thanks in advance.
ReplyDeleteHi mam,
ReplyDeleteI have stitched 2 salwar khameez..but i am facing a problem..wen i wear the khameez ,the neck goes up..why is it so..and how can i tackle it..pls explain...
How to take arm hole depth. My chest measurement is 40". In your tutorial it is given that arm hole depth is 1/4 of chest . Then it will be 10". Pl help
ReplyDeleteHi mam,why shoulder &neckline goes backward when I wear kurta ,plz reply.
ReplyDeleteWhy my shoulder neckline goes backward when I wear kutra
ReplyDelete*check back neck depth (that should be 1/2" or 1" less than front neck depth)
ReplyDelete*Correct armhole msrmnt
(0-2) = Armhole depth = ¼ chest – 1”(for chest msrmnt upto 36") or 2”(for chest msrmnt above 36")
ReplyDeletefirst check ur kameez back neck depth, that should be 1/2″ or 1″ less than front neck depth
ReplyDeletethen Correct armhole msrmnt
Thank u.. Maria... Hip length is shoulder to hip msrmnt.
ReplyDeletethank you very much madam its really easy to understand.nice tutorial.
ReplyDeleteHi Keerthi I cut the blouse pattern according to you're saree blouse pattern . It came good except for the centre dart .my cup size is 42 inches
ReplyDeletevery useful tutorial
ReplyDeleteHi mam ur tutorial is good for beginners, I sew Chudi after stitching I face a problem that in my Chudi folded lines appear near waist at back side, how to correct it. Can you help me out?
ReplyDeleteThank u... suneetha... happy sewing...
ReplyDeletehi.. priya.. plz ensure ur measerments again.. and follow the procedure provided in this tutorial. if u face this problem again, make darts at back side.
ReplyDeleteWow. That was a perfect guide. Thank You. What happens to the front piece in case of maternity size? Do let me know.
ReplyDeleteThank you sooooooooooooo much its toomuch help full
ReplyDeleteHi what does. 1/4 chest - 3/4 means is it to subtract
ReplyDeleteHi
ReplyDeleteWhile searching trendy neckline cutting
For kurti seen ur useful tutorial. Awesome . Please give different neckline cutting and sewing
Hi,
ReplyDeleteI have been facing some problem in armhole depth and its measurement when the front neck and back neck is deep. sometimes I get excess fabric at the front armhole and sometimes it is tight on the body. Please clarify my doubt; here the round bust (not chest, please make sure if for chest line chest round needs to be taken) measurement is 41.
Hi.. Awesome work and very useful for beginner like me. Thank you so much!
ReplyDeleteHi.. shaheena.. yes you are right ... you have to subtract 3/4" from 1/4chest measurement. If chest 36" means 1/4*36"= 9" so.. 9"-3/4"= 8 1/4". hope u understand... happy sewing..
ReplyDeleteHi.. Dillip .. Do u give curve line for front armhole part in sleeve... if the excess fabric in sleeve.. u have to give a perfect curve {Shape 0-x-3 front armhole curve} or if it is in kameez armhole portion.. make sure to give a perfect curve {Shape (6-x’-3) front armhole curve.} hope it is helpful.. Happy sewing
ReplyDeletethank..u.. Happy sewing..
ReplyDeleteThanks dear Kirthi. I am a man of 51 years, a food and dairy technologist and got interested in stitching for myself and my daughter and wife during my leisure. Your tips for salvar kurta are very easy to follow and taking this learning to appease my near ones. Thanks.
ReplyDeleteDo reply Kirthi.
ReplyDeleteHai mam, my daughter is 12 yes old. She is very thin. Now a days churidars and tops are not suit for her. If she wear leggings or jean her leg is like a stick I feel very bad for that but she looks good. I don't know which type of dress she wear. Pls tell me mam. Recent days I m very upset about this. I will wait for ur reply
ReplyDeleteHi jeevitha.. i'm facing this same problem now... because my 10 yrs old daughter also very skinny... here some tips that may help you... *The best tops are simple, fairly fitted ones that have some detail like ruffles or pockets to fill out your slim appearance. *wide leg and flared jeans(flare should starts blow knee) *you can choose high waist dresses *don't choose too tight as well as too loose fit. i hope this will help to your daughter and you.
ReplyDeleteMam,you made an impossible possible to me in the matter of front and back sleev cutting.
ReplyDeleteThank u so much
To add s.a in arm hole shoul I add to 0-2 or 2-3 , I didn't understand where to add seam a. In neck line and in figure didn't find 8'
ReplyDeleteHi.. Nisha.. Thanks to mention that.. 8' end of back slit opening(That bold line starts from 8 and that ends in 8'). S A should be added in 6-x'-3 & 6-x-3 of the armhole area in kameez. I hope u understand.. Happy sewing..
ReplyDeleteHello Keerthi it was very easy to understand the cutting pattern I am eagerly waiting for your next pattern I will be. happy. If. You teach. ME frock with Peter pan collar
ReplyDeleteHi Keerthi,
ReplyDeleteExcellent tutorial. did you make a book yet? If you do so, please add me ti the list to buy .
Am getting very excited and it seems very interesting to go through your tutorials.
ReplyDeleteWonderful job!
Thank you Keerthi for you sharing of knowledge and kindly explain regarding arm hole cutting
ReplyDeleteMam, can you please explain how to measure and stritch boys formal shirts..
ReplyDeleteMam,one more question how to measure the highest point of the burst.
ReplyDeletemam can u expalin about the dart which we keep in kurti or kameez we have the hip dart and bust dart can u tell where we need to keep and measurement also how to stitch
ReplyDeleteThanks a lot..
ReplyDeleteHi Madam can u tell arm hole marking and cutting for sleeve and sleeveless top.
ReplyDeleteAlso do we need to give front sleeve shape to attach sleeves for readymade dress.
Hi..Jessy...Front arm hole and front sleeve Shape must for any of the dresses for perfect fit and free arm movement.
ReplyDeleteThank u for your visit..Nazia..
ReplyDeleteHi.. ANu.. Usually we don't give any darts for straight Kameez. It's a casual wear.. You can see dart details in circular Anarkali and Lehenga choli Tutorial.
ReplyDeleteHi.. Ramya.. Next tutorial is all about what u want.. pls.. wait for few days..
ReplyDeleteHi mam i want to learn stitching.pls i dont anything about measurements.i had seen ur discription but i didnt understood that pls i want to learn.pls mam can u help me.
ReplyDeletewill u pls tell me how to measure
ReplyDelete0-2
2-10
10-12
or if there is any standardized measurement of these.
pls
Very clear to understand. Thank you
ReplyDeleteI did not find 8 - 81 point
ReplyDeleteReally nice and easy explanation. Thank you.
ReplyDeleteHi.. Kavita... Pls refer construction details again.. 0-2 has to be calculate.. there is no measurements of 2-10 & 10-12. That is 0-10(shoulder to waist) & 0-12(shoulder to hip or seat). I hope you understand now..
ReplyDeleteHi.. vasudeo.. thanks for mentioning... Sorry for your inconvenience... 8-8' is back slit opening.. I gave measurement details in tutorial... My mark of 8' is near by 2.
ReplyDeleteHi Keerti...i am using only 4 inch length to my sleeve. But when trying to attach the sleeve (1/2" + 4 " " 1 inch) sleeve with the bodice...i'm finding issue....do we have to cut the sleeve differently, if sleeve length is small (like 4" ) ?
ReplyDeletePlease help me.....
Hi Keerthi,
ReplyDeleteGlad to see people like you helping novices like us. I was in search of detailed Kurtha making lesson and found yours blog interesting. Keep on the good work!
I've a doubt should we leave Sean allowance around the curve of sleeves?
Dear Mam..
ReplyDeleteI am a beginner. Really it is easy for the beginners. Thanks a lot. Waiting for different patterns of neck tutorial
thanks...teach neckline xutting and stitching perfectly
ReplyDeleteDear mam,
ReplyDeleteThank you so much... very nice and easy explanation given by you.
Do you have any tutorial an collers. Like stand on high neck... etc.
Can you pls e mail those to me.
Thank you
Rashmi
Hi Keerthi,
ReplyDeleteCan I follow same construction for cutting kids kameez ? Any other changes have to be made.
please tell.
Thanks
ReplyDeleteThanks, this is great!!
ReplyDeleteHello, This is really great measurement. I have a question. I checked and found that you mentioned 8' for "Back slit opening" but we didn't find it. So can you please guide us where is 8' point so we can measure it too.
ReplyDeleteThanks
You learn me measurements and parttrns
ReplyDeleteHi Keethi mam, I can't understand neck design patterns. Pls help me mam and send neck design websites.
ReplyDelete