Saree or sari is the traditional wear in South Asia especially in India. It has different ways of wearing style that depends upon the state, region and community. The sari is the most elegant and beautiful wear. It can be worn for different occasions, in different ways to give you a different look each time. Saree is always worn with Blouse. Here is the tutorial for the Saree Blouse.
Blouse Measurement:
Back length Front length
Chest Waist
Shoulder Point length (or) ½ chest + 1” approx.,
Distance between points Across back
Across front Armhole
Top sleeve Sleeve length
Round arm Front neck depth
Back neck depth
Blouse Material Calculation:
2 length + 1 sleeve length + 4” SA
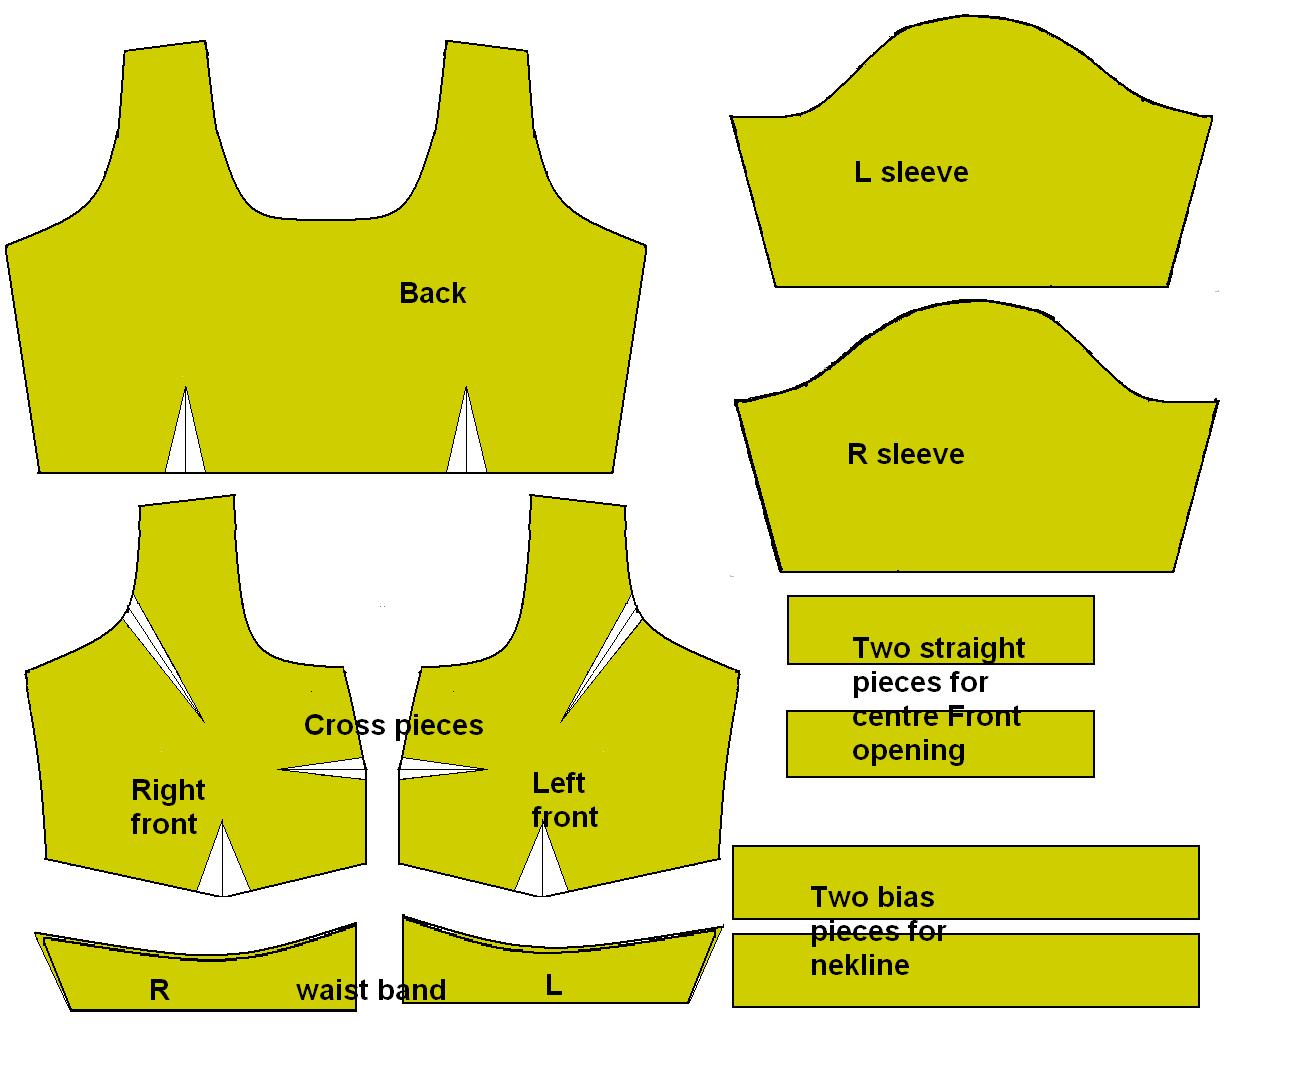
Blouse Pattern Constructions:
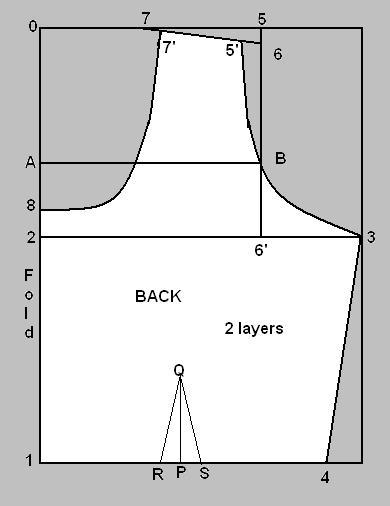
Blouse Back Part Pattern
(0-1) = length
(0-2) = Armhole depth
- 1/5 chest for up to 30” chest measurement.
- ¼ chest – 1/15 chest for 30” to 35.5” of chest measurement.
- 1/6 chest for 35.5” and above chest measurement.
(2-3) = Chest line = ¼ chest +1¾”
(1-4) = Waist line = ¼ waist + 2 cms for dart. P is the mid point of (1-4)
(P-Q) = dart length = 3” to 3½”
(R-P) = (P-S) = 1cm
(0-5) & (2-6’) = ½ shoulder
(5-6) = shoulder drop = 1cm
(0-7) = 1/12th chest
(0-8) = Back neck depth as desired
(0-7’) = 1/8th chest – 1.5cms 7’ is on the line (7-6)
(6-5’) = shoulder is pushed in by 2cms for low neck measurements.
(6’-B) = ½ across back. Shape armhole from 5’-B-3
Measure 5’-B-3 should be equal to ½ armhole (+/- 0.5cm)
Cutting line:
8-7’-5’-B-3-4-1 (8-1) on fold.
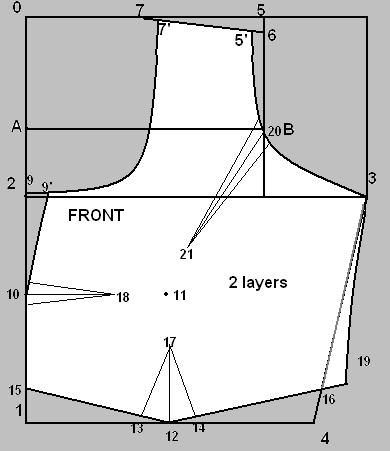
Blouse Front Part Pattern
(0-1) = front length
(0-2), (0-5), (2-6), (0-7), (0-7’), (6-5), (2-3), (6-5’) & (1-4) same as back construction
(0-10) = Point length (or) ¼chest + 2cms
(10-11) = ½distance between points
(11-12) = (10-1)
(1-15) = 5cms (4-16) = 3cms
(0-9) = front neck depth
(9-9’) = 1.5cms inside
Join (9’-15) Join (15-12) & (16-12)
Diagonal line for a normal figure & curved line for a heavier figure.
Blouse Darts:
Centre Big Dart:
(12-14) = (12-13) = 3cms for sizes upto 90cms
= 4cms for sizes above 90cms
(11-17) = 1.5cms
Dart length (17-12) should be approximately 6cms.
Centre Front Dart:
(10-18) = 0.5cm an either side
18 is 1.5cms from 11.
Armhole Dart:
(3-20) = 1/12 of chest 0.5cm on either sides of 20.
21 is 3cms from 17.
(2-A) = (6’-B) = 1/3of (6-6’). (A-B) = ½across front.
Shape 5’-B-3 front armhole curve.
Measure 5’-B-3 it should be more than actual armhole by 1cm.
5’-B-3 front armhole curve is a deeper curve than the back armhole curve.
Waist Line:
Measure (15-12) and mark the same as (12-19). If (15-12) is 4” means mark (12-19) 4”.
Join (3-19) side seam.
(13-15) + (14-19) = ¼waist + 2cms
Cutting Line:
9’-7’-5’-13-3-19-12-5-9’
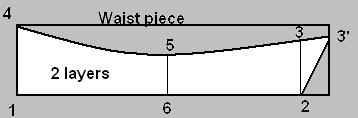
WAIST BAND:
(1-2) = ¼waist
(2-3) = (3-4) of back draft – (3-19) of front draft
(1-4) = (12-13) +2cms 6 is the mid point of (1-2)
(5-6) = (12-13) – 1.5cms
(3-3’) = 1.5cms outside Join (3’-2)
(1-2) can be taken on fold.
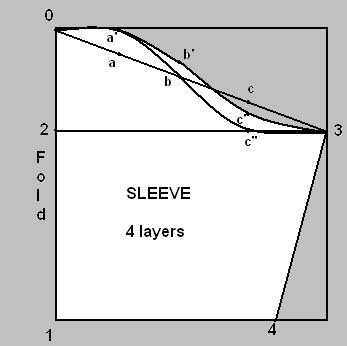
Blouse Sleeve Pattern:
(0-1) = sleeve length
(0-2) = 1/12 chest +2cms
(2-3) = ½ top sleeve + 1.5cms (or) (0-2) of body draft + 1.5cms
(1-4) = ½ round arm
Join (0-3) and divide into 4 equal parts at a, b, c
(a-a’) = 1.5cms outside
(b-b’) = 0.5cms outside
(c-c’) = 0.5cms inside
(c-c’’) = 1.5cms inside
Shape back armhole curve (0-a’-b’-c’-3)
Shape front armhole curve (0-a’-b’-c’’-3)
SEAM ALLOWANCE:
0.5cms at neck line
1cm at armhole curve and waist band hemline
1.5cms at shoulder line
2 to 2.5cms at side seam and back part hemline
1cm at waist band and Centre Front.
Blouse Stitching Instructions:
- 2 Straight pieces for hook strips and Bias (cross pieces) for neckline has to be cut with appropriate measurements.
- First 2 small darts have to stitch at the back part straight to the shoulders.
- Then the main three darts have to be stitched carefully in the front part. The dart stitched at the bottom should be bigger that the 2 darts at the left and right sides.
- The Waist band part has to be stitched after stitching the three main darts, the front part has to be stitched to the Waistband part. After attaching the Waist band to front part the length is equals to the back part.
- Turn the front pieces wrong side out and sew along the hemlines (separately) with 1cm seam allowance. Turn right side out and press.
- Now have to attach the straight pieces to make the hook straps at the either side of front opening.
- Time to attach shoulders of front and back parts correctly.
- Sleeves have to be added with blouse. First finish the hemline of sleeves and attach the left and right sleeves to the blouse.
- Now attach the side seams using 2cms seam allowance. Stitch has to start from the hemline of sleeve and ends with the hem line of blouse.
- The neckline has to be fished with bias (cross piece) piece.
- Attach hook and lock on an either hook strips at front opening.
Hi,
ReplyDeleteI love sewing and really your website is more helpful for the begginer.. I have a request, If possible, please post Men's shirt pattern.(how to draw the pattern ) Step by step.. Its more helpful for me and the followers.
Thank you.
Thanks for your comment Harini... Men's shirt tutorial should be in my future tutorial... Thanks to remind..
ReplyDeleteHi kirthi.very help full vedeo..I tried a blouse according to your draft.mother come out perfect but I had only one prob in armhole round. .it was loose n bulging.how do I rectify it?kindly let me know. Once again thx for ur tutorial
ReplyDeleteHi.. Anitha.. Thanks for or comment..this will helpful for readers..
ReplyDeleteFor armhole adjustment u should move the line(2-3) towards up for tight fit.. u should compare the measurement with ur old blouse while drafting because some time measurements are depends upon the person..
very useful
ReplyDeleteHi.. Mam nicely explained..I need 6'-B measurement in back part how to draw this..1/2 across back means what?size i used is waist 30'' armhole 16'' overall length 13'' chest 34''
ReplyDeletehello hi madam ,i am s.anitha from padi .i want some tips for blouse and chudi .bcoz i have two daughters . i am interesting in tailoring so give tips and more videos send mail id mam.
ReplyDeletemail me at keerthiezhil@gmail.com
ReplyDeleteHi keerthi mam, v.useful for ur explained.then I want how to stitch the Saree blouse step by step includes the final finishing step.please send the videos its v.useful for me and the follow ers.thank u mam.ple reply.
ReplyDeleteHi Keerthi, do you have any video clips on how to sew this blouse.
ReplyDeleteVery useful information. Tutorials help me to cut blouse .
ReplyDeleteHi Keerthi please the measurements are given inches or cm. thanks.
ReplyDeletesome msrmnts mentioned in cms and others mentioned in Inches...
ReplyDeleteThank u.. pushpa.. Happy sewing...
ReplyDeleteNo.. not yet...
ReplyDeletehi.. devi...I'll try to make videos in future... Happy sewing..
ReplyDeleteHi Kèerthi....very useful info for beginners like me. Can you post on how to cut and stich puff slèeves. Thanks
ReplyDeleteIf You can Please email me the 28 and 30 sari blouse pattern
ReplyDeleteMam nice site. Pl guide me how to alter readymade saree blouse ...where shoulder is loose ..keeps falling
ReplyDeleteHi mam!can u draw the picture for stitching chudithar!!!!
ReplyDeleteIt's a good website for womens.
Reply pls mam
Hi Keerthi,
ReplyDeleteThis tutorial is very good. If You can Please email me the 32 and 36 sari blouse pattern with the sleeve. hanks, Harini
My email is hlusha24@gmail.com
hi.. Rani... now i'm preparing some other tutorials.. so.. that could be our future one.. thank u.. happy sewing..
ReplyDeleteVery helpful thank you
ReplyDeleteNanum tailoring kathukitan but cutting and stitching oluga vara mattengudu please help pannuga
ReplyDeleteHi.. Kani mozhi... alagaana peyar... intha blog-la irukkara tutorials try panni paarunga... and practice makes us perfect... Happy sewing...
ReplyDeleteKeep following... Happy sewing
ReplyDeleteThnx for the tutorial.... Mam, I can't understand the measurement of 6'-B... 1/2 across back means what? Waiting for your reply... Thank you mam...
ReplyDeleteReply
Hi i have a wrkshop of designer wear of women, you change my mind today there is lots of waste material in my shop, we throw all but now today onwards i m going to create new things from the waste.
ReplyDeleteAlso i m totally dependant into my masterji but i m promiseing my self to start my learning again for better way .
Thank you mam.
Kiran bora
Hi Madam, I liked your tutorial. Method is simple and easy to understand for learners. I am interested in stitching blouses and kurtis for my daughters. Can you also throw some light on cutting and stitching of simple anarkali kurtis. Thank you.
ReplyDelete*plz send me videos princess cut peper cutting, fabric cutting & stiching method
ReplyDeletemadam u have shown the measurements in some places as centimetres. whether all the measurements should be taken in cms or only where it is menttioned only. generally body measurements are taken in inches.please clarify.suresh babu
ReplyDeleteGood explanation. Do you offer online class? I learnt tailoring long time ago. Now I want to refresh the stitching knowledge and also would like to learn some new skills. Pls. email me at seebha2010@gmail.com. Thanks.
ReplyDeleteIf there is some mistake in cutting line of front part, it seems me so..please help
ReplyDeleteMadam, very useful tutorial. Mam i would like to meet you is you are in chennai. I am interested in learning machine embroidery. Any body can come home and teach me. What machine is suitable for it. I am residing in adyar.
ReplyDeleteAcross back means Back shoulder to shoulder measurement. hope u understand ... happy sewing
ReplyDeleteGood to see your comment... all the best for ur new ideas.. Happy sewing..
ReplyDeleteonly in some places we have to use Cms because of the perfect fit.
ReplyDeleteNo..dear.. i use this same construction for my own..
ReplyDeleteHi mam, is the measurements includes seeming allowance also. If not how much we have to leave. Pls guide me. Thank u
ReplyDeleteHi mam
ReplyDeleteGood tutorial good effort..really appreciate ur intrest.. Im totally new to this n i want to learn. Im a beginer so i dint understand the tailoring measurements properly ..i was thinking like 1/6th of total chest measurement i.e., 1/6*number(chestsize).. Am i correct ..please let me knw.. Would also like to knw how did u get 1/6 1/12 ...can i use this for all blouses with diff sizes? If i knw this i can proceed with other measurements in same way..Thanku
" 1/6 chest for 35.5” and above chest measurement."
Hi
ReplyDeletewhat changes do we need to make if the front and back neck is very deep? The finished shoulder width is 4 cms , front neck depth is 19 cms and back neck depth is : 27 from shoulder
Appreciate your help.
Am in Ghana please i went you to help me
ReplyDeleteHi Your blog is so useful for me and I have a doubt ,In back pattern is 6'-B half across back or A-B half across back . Correct me if I m wrong
ReplyDeleteHi Ezhil, your tutorial is very usefull, but i still don't understand 6' - B please give more detailed information or What could be the approximate value for this?
ReplyDeletehi mam r u in youtube
ReplyDeleteit is very usefull thanks
ReplyDeleteHi the chest line (2-3) is marked this is full bust measurement. This coincides with the end of arm syce. Where as in reality the full bust is not where the arm syce ends. The full bust can be lower, so in this case won't there be excess fabric under arm ? How do you draft for this case please suggest. Also thanks for sharing so many nice tutorials on your blog.
ReplyDeletehai keerthi madam, i was saw this website for my mother. she is stiching 10 years. but she does'nt knows a normal blouse measurements. but now this website helps in many way thankyou madam for your kind social helps.
ReplyDeleteComment Text*i love this,well done
ReplyDeleteMarvelous....thankyou mam
ReplyDeletethanks for following our blog...
ReplyDeletethanks for your appreciation... Happy sewing
ReplyDeleteThank u divya.. i'm so happy about u and your mother... happy sewing...
ReplyDeleteI also don't understand the across back measurement (6'-B" = 1/2 across back. Would you be able to give an image on how you take measurements that tallies to your requirement?
ReplyDeletei have problem with sholder measurement, when i go with half of sholder for back deep neck (10" or 10+) then alway happening sholder fall problem. so plz give me the solution for the best sholder measurements, aso arm,
ReplyDeleteif chest 36 - 38
west - 30 - 32
sleeve hight - 4 - 5
round - 5.5 - 6.5
hi spandan.. if u go with deep neck u should reduce your neck width by 1/4" to 1/2" to avoid widen shoulders.
ReplyDeletej 'aimerais le faire mais c'est pas expliquer en français
ReplyDeletemadam ,
ReplyDeleteஇதை அப்படியே தமிழில் தரமுடியுமா பளீஸ்
Comment Text*idai appadiye tamilil thara mudiyuma madam pls ,yennaipol iruppavargalukku help a irukkum
ReplyDeleteMadam idhai appadiye tamilil tharamudiyuma ,pls yennaippol ullavargalukku help a irukkum.
ReplyDeleteHi...I am a starter and i really want to learn to stitch a blouse. Is it possible to do so by following the steps you have said about on your website? Can you give me some tips to learn to stitch properly?
ReplyDeleteHi... riznan... Ithai tamilil thara muyartchi seiyarean...
ReplyDeletebonjour je ne comprend pas votre langue mais serait il possible de m envoyer par mail le patron de taille 36 a 46 s'il vous plait
ReplyDeletehai this is Bharathi,
ReplyDeleteI want pattern of mermaid frock/skirt for girls
Hi mam
ReplyDeletePls tell me whether the seaming allowance is alloted in the calculation or we have to leave after marking the measurements...
Please send me bouse pattern for 40 and 42.
ReplyDeleteemail is deeptihemender@gmail.com
Hi iam kausar i would like to stitch perfect blouse
ReplyDeleteHey Kirthi,, Can you tell the average meter required for a sari blouse... a blouse with elbow sleeve and boat neck in the front and back.. I mean. Will 0.80 meter be sufficient?
ReplyDeleteMy front size is 31 ..I dont no abt chest and shoulder.. waist is 27...
ReplyDeleteHi.. Anne.. if your front blouse draft with cross piece you need 0.90 meter or more
ReplyDeleteI had only one prob in armhole round.plz help panunga..perfect arm hole ku 44'' body ku evalavu inch arm hole edhukanum madam plz help me.......
ReplyDeleteVery clear instruction for beginners. Very good blog.
ReplyDeleteHi Keerti, Really very nice.
ReplyDeleteWhile wearing the blouse,in the joining of shoulder and hand there is some raise. How to correct? Kindly help me
Excellent site to learn . Wow. Very generous of you to share them free to all . God Bless you and your family for all that you do
ReplyDeleteExcellent. My size 32. Can you suggest cutting pattern with measurements.
ReplyDeleteExcellent. My size is 32 . Can you suggest cutting procedures with measures
ReplyDeleteHi Keerti, Really very nice
ReplyDeleteHai Keerthi,
ReplyDeleteவாழ்த்துக்கள்...
உங்கள் பதிவுகள் ஒவ்வொன்றும் மிக அருமையாக உள்ளது.
மிக பெருந்தன்மையாக செயற்படுகின்றீர்கள். உங்களை நேர்காணல் செய்ய விரும்புகிறேன் அனுமதி கிடைக்குமா...?
Your information is very useful. Thank you so much.
ReplyDeleteCan you explain. .how to find point to point measurement from bust size...for 40 size what will be the point to point measurement
ReplyDeleteIn armhole dart explanation u mentioned 6' but in the drafting u didn't mention 6' in the front drafting. .
ReplyDeletePlease use bracket for additional and division. ..
ReplyDeleteIt is very useful to know stitching.thank you.
ReplyDeleteI like ur tips mam.thank you so much.
Hi Keerthi, what is ACROSS BACK and ACROSS FRONT in measurements?
ReplyDeleteHow to calculate that? I am little confuse here.
there is one more , how to take top sleeve measurements?
ReplyDeleteAcross back means what maesurement
ReplyDeleteHi Keerthi
ReplyDeleteTried making pattern using above method.
In blouse measurements you've mentioned point length or 1/2 chest and in front pattern you've mentioned point length or 1/4 chest.
Please do clarify.
Also please tell how to measure point length?.
Omg,
ReplyDeleteAre you using this pattern to teach your students.
Very pathetic.
5 - 6' measures 8.5 inches but 6' to B measures 18. How did you get this.
Please don't teach like this.
I dont understand wat is the measurement (6-5’) = 1/2 across back...wat is 1/2 across back?
ReplyDeleteBlouse Back Part Pattern
ReplyDelete(6’-B) = ½ across back.
Blouse Front Part Pattern
(2-A) = (6’-B) = 1/3of (6-6’). (A-B) = ½across front.
Dear Madam,
Please clarify the following points -
1. Can I take (6' - B) in Back part pattern same as (6' - B) of Front part pattern.
2. can I consider Across back or Across front = shoulder length.
Regards
Harish
Same doubt for me please clarify mam
ReplyDeletehello, could you please show or explain where is the grain line on the patterns, or how to lay the pattern on the fabric. i cannot see this information and i would like the blouse to fit nicely. many thanks
ReplyDeleteHi mam,
ReplyDeleteMy name is Mahantesh,presently working as a pattern master in bangalore, mens styles no issue for the fitting,but ladies styles especially saree blouse its very difficult to fit the body,
Here one doubt, regarding 2-3, 1/4 chest measurement Ok, but why we need to add 1 3/4"extra, if we add 1 3/4" extra how to fix armhole. measurement