This is third part of shirt sewing tutorials… Here we are going to see shirt collar-cuff sewing instructions elaborately as well as simply. If any one new to this tutorial, please check previous 4 tutorials to better understanding of shirt details… Please refer previous tutorials as below…
- How to Draft Shirt Bodies Pattern?
- Sleeve, Collar and Cuff Pattern?
- How to Sew a Shirt? - (Part-1) - Bodies and Pocket attaching.
- How to Stitch a Shirt? - (Part-2) - Sleeve, yoke and slit making.
Side Joining and Hem Finish:
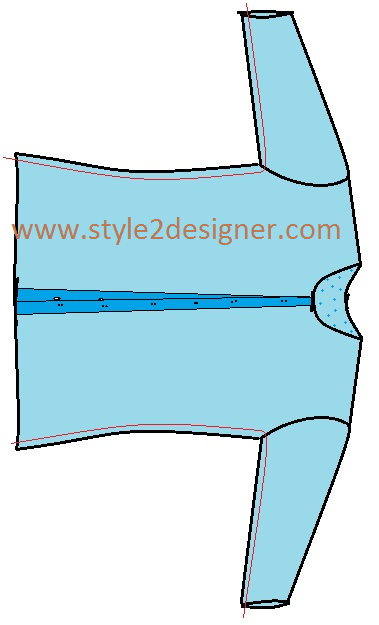
- Join the Side seams with 0.25” seam allowance. Start form sleeve and end with hemline. Repeat again for other side.
- Finish the hem by folding 0.25” and again fold 0.50” then giving an edge stitch.
Notes: *Here we saw sides seam allowance 0.25” if need you can make it up to 0.75”. *For hemline you can reduce it as 0.50” instead of 0.75”. If the hem sewing allowances 0.50” finish the hem by folding twice at 0.25” and giving an edge stitch.
Cuff Joining to Sleeve:
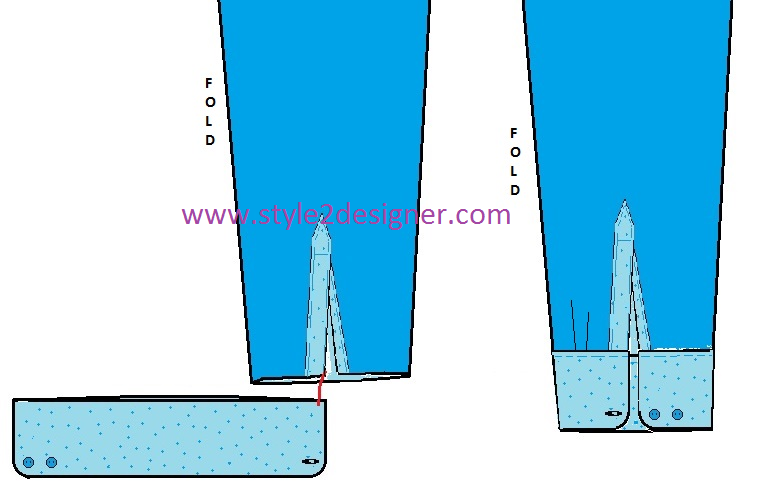
- Here we are going to attach cuff to sleeve in an easy way… the cuff looks like a pouch, we have to fold its seam allowances 0.25” inside and press.
- Now insert the raw edge of sleeve into the cuff, all the seam allowance of sleeve should be inside of cuff. Then secure with pin and sew the folded edges of cuff with all the thickness.
Repeat the above steps for another sleeve.
Collar Making:

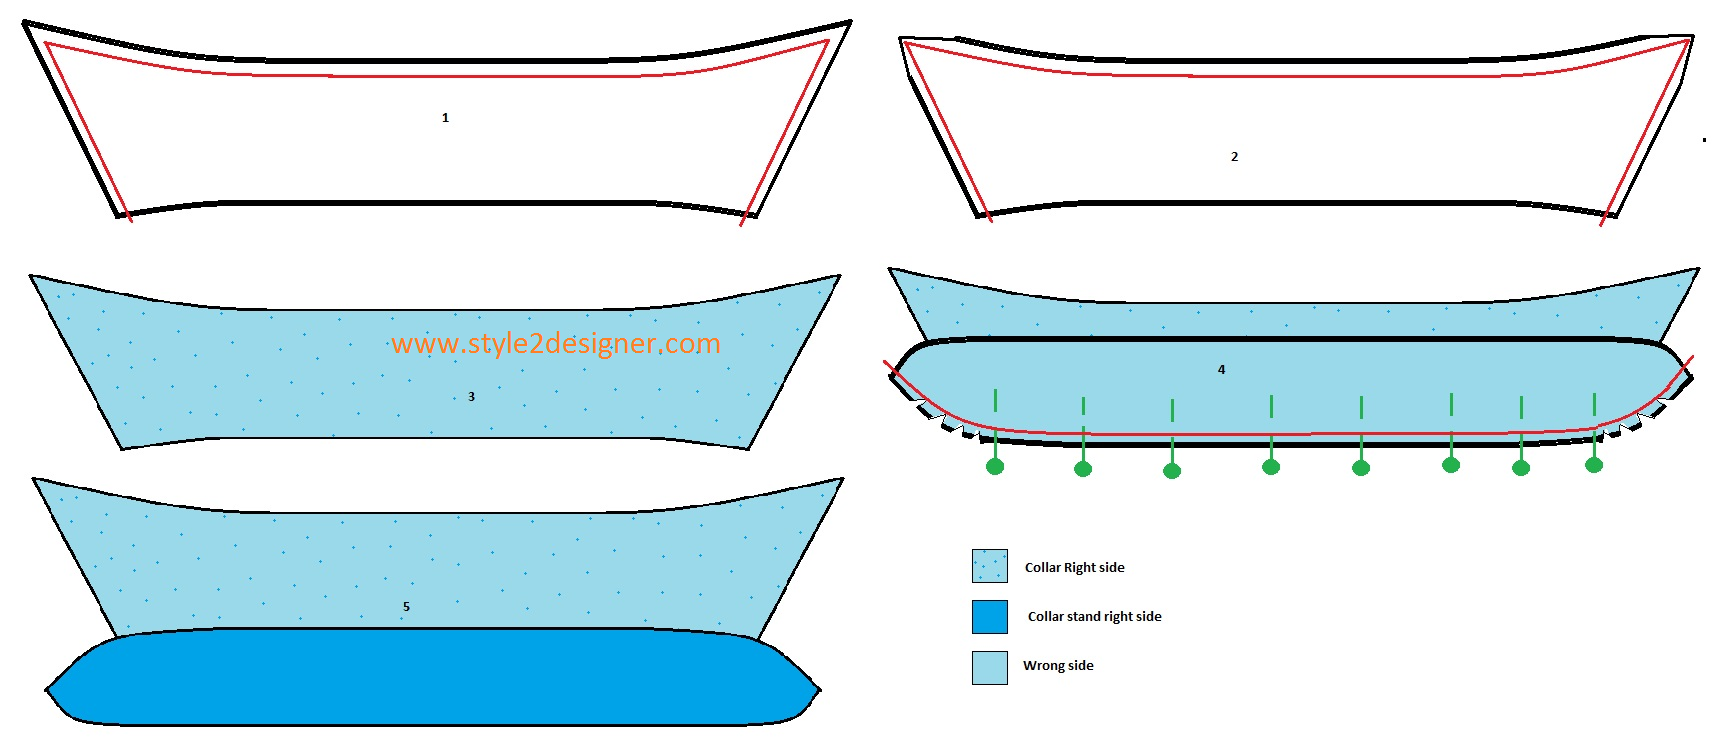
We have 2 fabric pieces and 1 piece of interlining material for each collar and collar stand. (Interlining for collar stand is optional)
- Place interlining material in wrong side of one collar piece and press. Then pin collar pieces by right sides facing together and sew along the three sides mentioned in the image with 0.25” seam allowance from edge.
- Cut seams of upper corners to avoid bulk inside the collar flap points.
- Turn right side out and press.
- If you are using interlining for collar stand place interlining material in wrong side of one collar stand piece and press. Then place upwards down one collar stand piece over the collar’s raw edge line and another one collar stand piece at under the collar like sandwich(refer image) by facing right sides together and pin. Now sew along the red line mentioned in image.
- Cut notches at curved seams then turn right sides out and press.
Note: If collar flap points disturbs while sewing collar stand with collar, just fold that two flaps inside and pin.
Attaching Collar to Shirt:

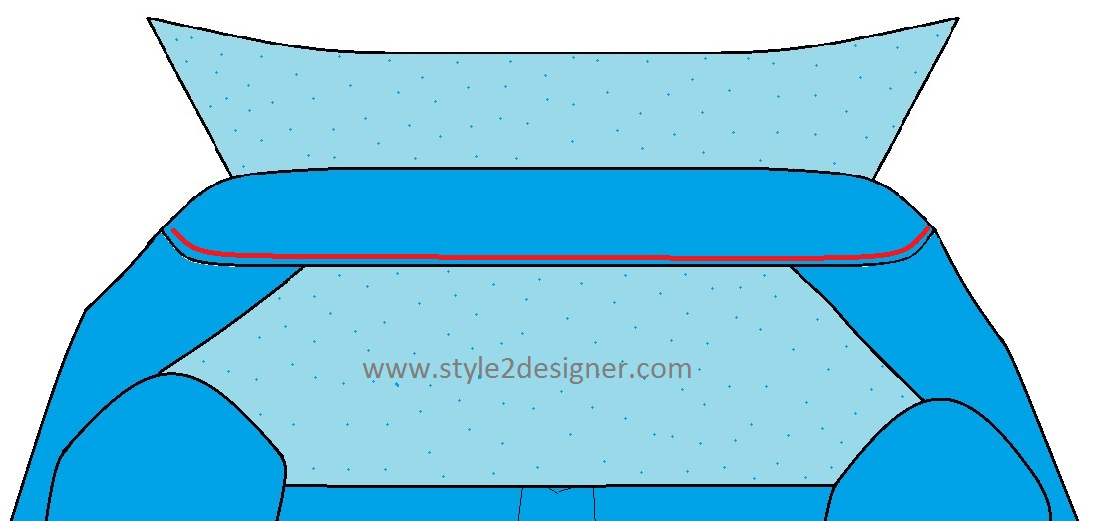
- Place one side of collar stand’s right side over the wrong side of neckline and sew away 0.25” from edge.
- Now flip it to the right side and fold the seam allowance 0.25” inside the collar stand and cover all the seams of neckline and finish with top edge stitch at folded collar stand.
Finishing Touches:
- Edge stitching gives a well-finished look to outfit, but only if it is straight and flat. Long stitches of 4-5 mm appearance best in edge stitching. Sew edge stitching only after you have ironed the seam.
- Make button holes in buttonhole placket, cuff and collar stand. (Collar flap point buttonholes are optional)
- Sew buttons on button stand, cuff and collar.
- Press carefully. Now our Shirt is ready...
Note: Here we learnt shirt sewing and drafting in my own way, but there is some other ways also.
I hope it’s enough to learn and make your own designed shirt.
Catch you all with another tutorial…
Comments
Post a Comment